Install Postgres in cent os 7

for install

https://www.digitalocean.com/community/tutorials/how-to-install-and-use-postgresql-on-centos-7


add user

https://www.digitalocean.com/community/tutorials/how-to-create-remove-manage-tables-in-postgresql-on-a-cloud-server

cahnge password

http://stackoverflow.com/questions/12720967/how-to-change-postgresql-user-password

enable remote login

/var/lib/pgsql/data/postgresql.conf

default is

listen_addresses=’localhost’

change to

listen_addresses=’*’

to allow all connection using password use

/var/lib/pgsql/data/pg_hba.conf

host all all 0.0.0.0/0 md5

Install pgAdmin cent OS 7

Thanks to : http://postgresql.freeideas.cz/install-pgadmin3-1-22-on-centos-7/

But there are many edit command for use that tutorial. In this tutorial i write after try  another version of code program. XXX is version. don’t forget it.

For PostgreSQL 9.5 you need new pgadmin3 version 1.22 – older cannot connect into new database.

Installation is not exactly straight forward but not difficult:

  1. download package epel-release in this directory

https://dl.fedoraproject.org/pub/epel/7/x86_64/e/epel-releaseXXXX.rpm

2. yum install epel-releaseXXXX.rpm

3. install updates:

  • yum update
  • install pgadmin:
    • yum install pgadmin3
  • if you have desktop, pgadmin will be in “Applications / Programming”
  • from terminal run it using:
    • pgadmin3


optimize opencv to use mutli core support openmp

if you are just install opencv without openmv it will use use a single core of cpu usage. If you want to use multiple core, follow this step. 🙂 terimakasih…. 🙂

install all of this library and module

sudo apt-get install gcc-multilib

sudo apt-get install openexr

How to install OpenCV 3 on Raspbian Jessie

follow this step

http://answers.opencv.org/question/20955/enabling-openmp-while-building-opencv-libraries/

I open a bug : http://code.opencv.org/issues/3328

Workaround: Replace line 49 to 58 in file opencv-2.4.6.1/cmake/OpenCVFindLibsPerf.cmake :

# --- OpenMP ---
if(NOT HAVE_TBB AND NOT HAVE_CSTRIPES)
  include (FindOpenMP)      # --- since cmake version 2.6.3 
   if (OPENMP_FOUND)
      set (HAVE_OPENMP TRUE)
      set (CMAKE_CXX_FLAGS "${CMAKE_CXX_FLAGS} ${OpenMP_CXX_FLAGS}")
      set (CMAKE_C_FLAGS "${CMAKE_C_FLAGS} ${OpenMP_C_FLAGS}")
   else()
      set ( HAVE_OPENMP FALSE)
   endif()
else()
set(HAVE_OPENMP 0)
endif()


and then use this command to configure

cmake -D WITH_OPENMP=ON ..

remember the jvm and java to linked by cmake

if java no use this command to make java home

export JAVA_HOME=/usr/lib/jvm/java-6-oracle
make -j8

sudo make install


Integration JavaCV and Ubuntu and remote development for embedded


Install all of library of openCV

follow this step http://docs.opencv.org/2.4/doc/tutorials/introduction/linux_install/linux_install.html

git clone git://github.com/opencv/opencv.git
cd opencv
git checkout 2.4
mkdir build
cd build


cmake -DBUILD_SHARED_LIBS=OFF ..

check the java path. if all of java is ok, avoid this step. if can’t find java path, junit and ant, use this command.

export JAVA_HOME=/usr/lib/jvm/java-6-oracle
cmake -DBUILD_SHARED_LIBS=OFF ..

and then make

make -j8

and then install

sudo make install

all step is ok. and then you must integrate openCV to netbeans using remote desktop development.

go to Netbeans  project –> properties  –> VM Option

add the native library

-Djava.library.path=”/usr/local/share/OpenCV/java/”

in project dont forget to add library java. Download the opencv_2413.jar in  directory /usr/local/share/OpenCV/java/ to local computer and add to library in netbeans.

run using remote debugging.

and then finish… 🙂


note :

if there are a problem about

HIGHGUI ERROR: V4L/V4L2: VIDIOC_S_CROP
HIGHGUI ERROR: V4L2: Pixel format of incoming image is unsupported by OpenCV

dont forget to install libv4l-dev

sudo apt-get install libv4l-dev

and recompile

thankyouu


note :

dont forget to install libv4l-dev

su

Install node red on ubuntu 14.04

node red is visual programming and workflow for IoT. it develop by IBM. it easy way to programming your device. You can try node red on http://nodered.org/docs/getting-started/first-flow

the first install node JS

root@ea:~# sudo apt-get install npm

link library

root@ea:~#sudo ln -s /usr/bin/nodejs /usr/bin/node

install node-red

root@ea:~#sudo npm install -g node-red

run

root@ea:~# node-red

try in your browser using this address

http://localhost:1880/

Compile arduino command line for linux ubuntu 14.04

thanks to : http://hardwarefun.com/tutorials/compiling-arduino-sketches-using-makefile

you can to compile arduino project using command line using this tutorial. this tutorial use https://github.com/sudar/Arduino-Makefile from sudar. Thanks to sudar. 🙂

  1. Install arduino IDE. *you must instal arduino IDE in the first follow this instruction https://www.arduino.cc/en/Guide/Linux
  2. install arduino makefile using
    sudo apt-get install arduino-mk

    makefile will auto find arduino IDE path

  3. create directory example like
    root@hub:~/arduinoProject/blink

    an than crete file blink.ino use this https://github.com/sudar/Arduino-Makefile/tree/master/examples/Blink

  4. create Makefile and add property use this https://github.com/sudar/Arduino-Makefile/blob/master/examples/Blink/Makefile
  5. Try compile using this command
    root@hub:~/arduinoProject/blink# make


  6. If you need advance configuration, please visit this page https://github.com/sudar/Arduino-Makefile/blob/master/arduino-mk-vars.md

Java diaglog always top of frame

thanks to :
http://stackoverflow.com/questions/16802793/making-a-jdialog-always-on-top-of-application

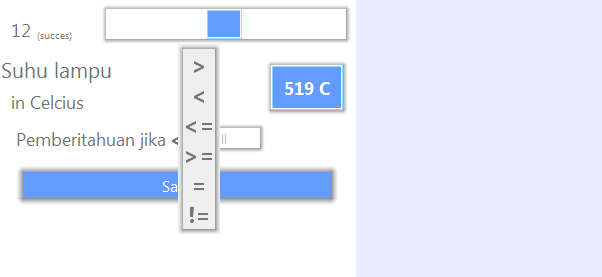
I have a project to make dialog  UI floating on top of frame.

Dialog on top of frame.PNG

You need to set the dialog’s owner and make the dialog modal:

JDialog dialog = new JDialog(parentFrame, true); // owner, modal

OR You can develop it using constructor

 public ComparatorSymbolChoserUI(JFrame owner,JLabel comparatorSymbol) {
 super(owner,true);
}

Thank you…..

Remove and disable ubuntu unkown display

My wintel w8 actualy have internal display. but i use hdmi cable.
My problem rise when my ubuntu boot. the display will show as extend and I can not see login screen.

I guest the UI to input my password and press enter.

Its work. but i want to make my system perfect.

I find the tutorial and got it:
http://askubuntu.com/questions/362081/two-monitors-when-only-having-one-in-13-10

My display like it :
umEZs.png

I want to remove unkown display when boot up

First, enter xrandr in your terminal. You will see that there are several outputs which are connected.

Screen 0: minimum 8 x 8, current 1280 x 800, maximum 32767 x 32767
DSI1 disconnected (normal left inverted right x axis y axis)
DP1 disconnected (normal left inverted right x axis y axis)
DP2 disconnected (normal left inverted right x axis y axis)
HDMI1 connected primary 1280x800+0+0 (normal left inverted right x axis y axis) 331mm x 207mm
   1280x800      60.00*+
   1280x768      59.87  
   1280x720      60.00    50.00    59.94  
   1024x768      60.00  
   800x600       60.32  
   720x480       60.00    59.94  
   640x480       60.00    59.94  
   720x400       70.08  
HDMI2 disconnected (normal left inverted right x axis y axis)
VIRTUAL1 disconnected (normal left inverted right x axis y axis)


select the screen want to disable DSI1

Edit grub using this command

gedit /etc/default/grub

And then change GRUB_CMDLINE_LINUX "video=DSI-1:d"

Caution about the format of video name in my xrandr the name is DSI1 but when you write configuration, use to DSI-1.

GRUB_DEFAULT=0
#GRUB_HIDDEN_TIMEOUT=0
GRUB_HIDDEN_TIMEOUT_QUIET=true
GRUB_TIMEOUT=0
GRUB_DISTRIBUTOR=`lsb_release -i -s 2> /dev/null || echo Debian`
GRUB_CMDLINE_LINUX_DEFAULT="quiet splash"
GRUB_CMDLINE_LINUX="video=DSI-1:d"

And it work for me
Thank you…. 🙂


Ubuntu can’t shutdown

Thanks for  : http://askubuntu.com/questions/578144/why-doesnt-running-sudo-shutdown-now-shutdown

Traditionally the command sudo shutdown now will take you to the runlevel 1 (recovery mode), this will happen for both Upstart and SysV init. To get what you want i.e. to shutdown the computer properly you need to give the -h switch to shutdown.

One thing to note here is that halt will close all the processes, turn off the CPUs and return the control to a ROM monitor of the mainboard needing the user to press the power button to get the power supply turned off, whereas poweroff after turning off the CPUs will simply turn off the power supply resulting in a proper shut down.

The -h switch of shutdown will either halt or poweroff the computer, the decision will be taken by the system although in Ubuntu i have seen that it would normally poweroff the machine. To be sure of that, you can use the -P switch with shutdown to poweroff the computer.

To summarize, here are the commands available to poweroff (not halt) a computer:

sudo shutdown -h now
sudo shutdown -P now
sudo poweroff
sudo halt -p
sudo init 0

The poweroff and halt commands basically invoke shutdown (except for the poweroff -f). sudo poweroff and sudo halt -p are exactly like sudo shutdown -P now. The command sudo init 0will take you to the runlevel 0 (shut down).

Now what if you want to shutdown forcefully i.e. don’t want to wait for processes to close normally, in that case you can use:

sudo poweroff -f

This will not use shutdown. Rather, it will invoke the eboot(2) system call (used for reboot, poweroff & halt) to power off the computer instantly.


I use shutdown -h now
“-h Requests that the system be either halted or powered off after it has been brought down, with the choice as to which left to the system.”

Ubuntu only background for server and embeded UI

I got some experiance about it.
Ubuntu is nice os with unity environtment but it is so big and weight for embedded appication.

I try to remove unity using plugin, but it is not work to.

I try to change environtment using xmonad

Thankyou : http://www.howtogeek.com/114728/how-to-use-xmonad-a-tiling-window-manager-for-linux/

This is great tutorial too :

http://beginners-guide-to-xmonad.readthedocs.org/

I use command from my ssh using putty to control my mini pc.
please see this article to use this tutorial :  https://dienastya.wordpress.com/2016/04/22/netbean-remote-platform-open-x11-to-origin-machine/

  1. install xmonad using : sudo apt-get install xmonad suckless-tools
  2. After installed. don’t worry  it show blank screen. so change the background to save your eye
  3. Install sudo apt-get install xloadimage
  4. Change the backround using this command
  5. xloadimage -onroot -fullscreen <path.to.image>

And finish.

thank you 🙂