Port forwarding with iptables

Thanks to :

Port forwarding with iptables


In this tutorial we’ll set up a simple port forwarding (NAT) using iptables.

1. Enable ip forward

echo "1" > /proc/sys/net/ipv4/ip_forward

2. Append routing rules to the nat table

iptables -t nat -A PREROUTING -p tcp -s 0/0 -d {local_ip} --dport {local_port} -j DNAT --to {destination_ip}:{destination_port}
iptables -t nat -A POSTROUTING -o eth0 -d {destination_ip} -j SNAT --to-source {local_ip}
  • {local_ip}: A ip address mapped on the local system
  • {local_port}: The port you would like to listen on
  • {destination_ip}: Destination ip address
  • {destination_port}: Destination port

3. Now you can access http://{local_ip}:{local_port} and would actually be getting response from http://{destination_ip}:{destination_port}

A working example

If the ip address of your system is 32.64.128.200 and you import the following rules, you would be able to connect to http://32.64.128.200:8080 and actually see the Google search engine because 216.239.59.105:80 is one of Google’s web servers.

iptables -t nat -A PREROUTING -p tcp -s 0/0 -d 32.64.128.200 --dport 8080 -j DNAT --to 216.239.59.105:80
iptables -t nat -A POSTROUTING -o eth0 -d 216.239.59.105 -j SNAT --to-source


To save the iptables use this application

apt-get install iptables-persistent

TO save the iptables use

iptables-save

Install laravel, php, nginx in debian or ubuntu

Thanks to : https://gist.github.com/santoshachari/87bf77baeb45a65eb83b553aceb135a3

In this case I use debian 8. I think it same with Ubuntu.

This is great tutorial and it work for me. 🙂

Install PHP 7 on Ubuntu/Debian

Run the following commands in sequence.

#if use ubuntu
sudo apt-get install -y language-pack-en-base
sudo LC_ALL=en_US.UTF-8 add-apt-repository ppa:ondrej/php

#if you use debian install
sudo apt-get install software-properties-common
sudo add-apt-repository ppa:ondrej/php
sudo apt-get update
sudo apt-get install zip unzip
sudo apt-get install -y php7.0 php7.0-fpm php7.0-mysql php7.0-zip php7.0-gd
sudo apt-get install nginx git

Important packages for Laravel

sudo apt-get install mcrypt php7.0-mcrypt
sudo apt-get install -y php7.0-mbstring php7.0-xml --force-yes

Some Optional ones

sudo apt-get install php7.0-curl php7.0-json

NOTE: You can use the following command to list available PHP 7.0 packages:

sudo apt-cache search php7-*

Modify the PHP Configuration

Run the following command to go to php.ini

sudo nano /etc/php/7.0/fpm/php.ini

And uncomment and fix cgi.fix_pathinfo to

cgi.fix_pathinfo=0

Restart PHP 7.0 FPM

sudo service php7.0-fpm restart

Configure Nginx for Laravel

I am going to setup using a blank latest version of Laravel. This would installed in /var/www/laravel folder.

Run the following in terminal:

sudo mkdir -p /var/www/laravel

Next, we are going to modify the nginx’s default configuration file: /etc/nginx/sites-available/default. But before that, just make a backup of the file:

sudo mkdir ~/Backups
sudo cp /etc/nginx/sites-available/default ~/Backups/default

Use the following command to edit the file

sudo nano /etc/nginx/sites-available/default

Next modify default from this:

server {
        listen 80 default_server;
        listen [::]:80 default_server ipv6only=on;

        root /usr/share/nginx/html;
        index index.html index.htm;

        server_name localhost;

        location / {
                try_files $uri $uri/ =404;
        }
}

to this:

server {
        listen 80 default_server;
        listen [::]:80 default_server ipv6only=on;

        root /var/www/laravel/public;
        index index.php index.html index.htm;

        # Make site accessible from http://localhost/
        server_name <Your Domain name / Public IP Address>;

        location / {
                # First attempt to serve request as file, then
                # as directory, then fall back to displaying a 404.
                try_files $uri $uri/ /index.php?$query_string;
                # Uncomment to enable naxsi on this location
                # include /etc/nginx/naxsi.rules
        }
        location ~ \.php$ {
                try_files $uri =404;
                fastcgi_split_path_info ^(.+\.php)(/.+)$;
                fastcgi_pass unix:/var/run/php/php7.0-fpm.sock;
                fastcgi_index index.php;
                fastcgi_param SCRIPT_FILENAME $document_root$fastcgi_script_name;
                include fastcgi_params;
        }
}

Notice the difference:

  • try_files $uri $uri/ =404; has been changed to try_files $uri $uri/ /index.php?$query_string;
  • and location ~ \.php$ { ... } block has been added.

Restart nginx.

sudo service nginx restart

If all was configured well, you’d see no error.

SWAP file (Optional)

Swap files would help in cases where your server might run out of memory.

sudo fallocate -l 1G /swapfile
sudo mkswap /swapfile
sudo swapon /swapfile

Install Composer and Laravel

Use the following commands to install composer and make it available across all folders.

cd ~
curl -sS https://getcomposer.org/installer | php
sudo mv composer.phar /usr/local/bin/composer

Test by composer command to see if it was installed correctly.

Install laravel by using the following command.

sudo composer create-project laravel/laravel /var/www/laravel

In case it throws out errors due to missing packages, find the package name using

sudo apt-cache search php7-*

and then remove and create the folder before running the composer create-project again.

sudo rm -rf /var/www/laravel
sudo mkdir /var/www/laravel

Setting the permissions right for the Laravel folders.

sudo chown -R :www-data /var/www/laravel
sudo chmod -R 775 /var/www/laravel/storage

Finish

Check your site by http://server_domain_or_IP and it should show you “Laravel” homepage.

Other commands of use.

Installed a package that you don’t need? Use the following commands to remove the package.

sudo apt-get purge <package name> 
sudo apt-get autoremove --purge

Use following command to remove a folder and it’s contents

sudo rm -rfv <folder_name>

Test PHP version

php -

Install nginx in debian vagrant

nginx is another option for cgi. Previous project I use apache2 and now I mus use nginx. Ok. Nginx is just web server it must config to enabling php. It use fast cgi
tank you : https://www.sitepoint.com/setting-up-php-behind-nginx-with-fastcgi/ I use this tutorial and it work for me.
Before follow this article I install nginx and php and composer.

sudo apt-get install nginx

install using this command

sudo apt-get install php5-cli php5-fpm

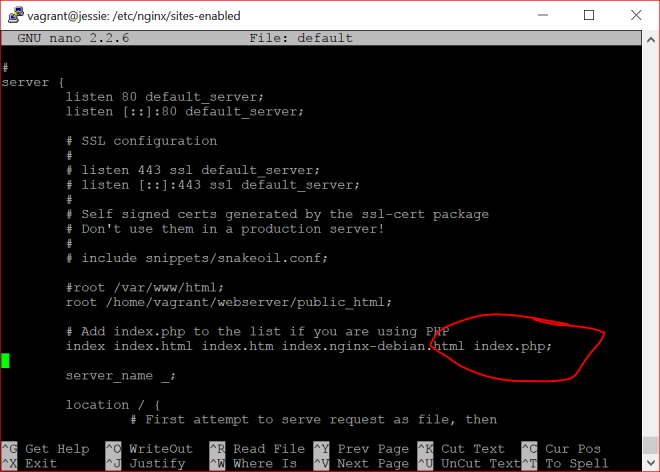
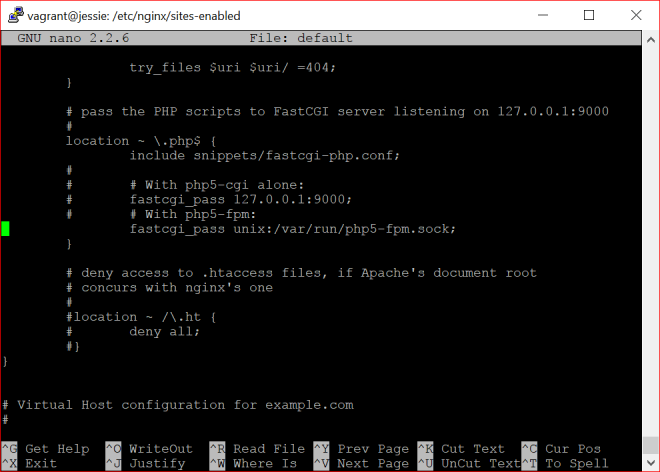
and then I config this config in sudo nano /etc/nginx/site-enabled

config nginx default page

and then don’t forget to add php extention for nginx to execute this file

add php extention file

and then create file .php in root web.
info.php
<?phpphpinfo();
?>


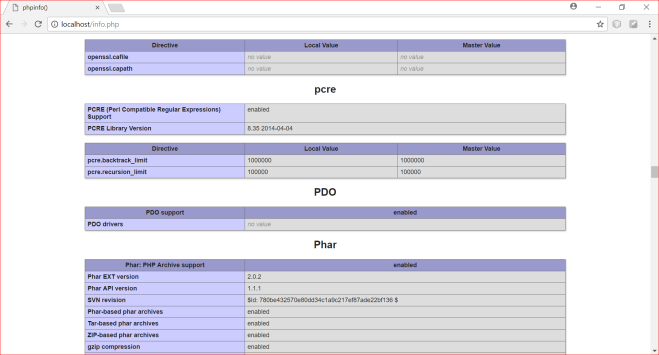
finish you can load browser

php browser info.PNG


Install Drivers for TL-WN725N V2 -for raspberry

Thank you : https://www.raspberrypi.org/forums/viewtopic.php?p=462982#p462982

Be aware about kernel version and build to matching with driver build.

uname -a

Linux raspberrypi 4.4.38+ #938 Thu Dec 15 15:17:54 GMT 2016 armv6l GNU/Linux

you can see 4.4.38+ #938). [kernel Build]

4.4.38–> kernel

938 –> build

so i use 8188eu-kernel-build.tar.gz

8188eu-4.4.38-938.tar.gz

follow more update in https://www.raspberrypi.org/forums/viewtopic.php?p=462982#p462982

Install Mail Server (Postfix) using ‘SquirrelMail’ (Webmail) on Ubuntu/Debian

Thanks to original post : http://www.tecmint.com/setup-postfix-mail-server-in-ubuntu-debian/

Creating a mail server on Linux powered machines can be one of the most essential things that every system administrator needs to do while configuring his servers for the first time, if you don’t know what it means; it’s simple, if you have a website like “example.com”, you can create an email account like “username@example.com” to use it to send / receive emails easily instead of using services like Hotmail, Gmil, Yahoo Mail.. etc.

Setup Postfix Mail Server in Debian

In this article, we’ll learn how to do so by installing the Postfix with “SquirrelMail” webmail application and its dependences on Debian/Ubuntu machines.

Step 1: Installing Apache2 and PHP5

1. In order to create a running mail server using “SquirrelMail”, we’ll have to install both Apache2 & PHP5packages first, to do so, run.

$ sudo apt-get update
$ sudo apt-get install apache2 php5

Install Apache and PHP in Ubuntu

Step 2: Installing Postfix Mail Server

2. Postfix is a mail transfer agent (MTA) which is the responsible software for delivering & receiving emails, it’s essential in order to create a complete mail server.

To install it on Ubuntu/Debian or even Mint, run:

$ sudo apt-get install postfix

During installation, you will be asked to choose the default file configuration for your server.

Postfix Configuration in Ubuntu

3. Next, it asks you to select type of mail configuration, choose “Internet Site”.

Select Mail Configuration

4. Now enter the fully qualified domain name that you want to use for send and receive mails.

System Mail Name

5. Once the FQDN set, you’ve restart the Postfix mail server using.

$ sudo service postfix restart

Step 3: Installing Dovecot

6. Dovecot is a mail delivery agent (MDA), it delivers the emails from/to the mail server, to install it, run the following command.

$ sudo apt-get install dovecot-imapd dovecot-pop3d

Install Dovecot in Ubuntu

During the installation process, you will be asked if you want to create a self-signed SSL certificate, choose Yes.

Create Mail SSl Certificate

7. Next, enter your host name to use in the SSL certificate.

Enter Hostname to use SSL

8. Next, restart Dovecot service using the following command.

$ sudo service dovecot restart

Step 4: Installing SquirrelMail

9. SquirrelMail is the email server that you’ll be using to manage emails on your server, it has a simple web interface to do the job, it can be customized by installing more modules & themes.

$ sudo apt-get install squirrelmail

install squirrelmail in Ubuntu

10. After the installation, you will have to run this command in order to configure SquirrelMail.

$ sudo squirrelmail-configure

Configure Squirrelmail in Ubuntu

11. Next, enter “2” in order to edit the server settings, and you will be prompted to it.

Configure Server Settings for Mail

12. Now enter “1” in order to change the domain name and write up your domain (e.g: example.com).

Set Mail Domain Name

13. Go back to the main menu by writing “R” and hitting the enter key, write “4” in order to configure the general options.

Configure Mail General Optionsb

You see “Allow server-side sorting”? Enter “11” and change it from “false” to “true” by entering “y”. Now hit the Enter key, and enter the “S” key in order to save the configuration file.

Now, we’ll copy the default configuration file to the apache2 directory in order to be able to access the web interface, run.

$ sudo cp /etc/squirrelmail/apache.conf /etc/apache2/sites-available/squirrelmail.conf

And enable it using:

$ sudo a2ensite squirrelmail.conf

14. You can now access the mail server by going to example.com/squirrelmail.

Access Squirrelmail in Ubuntu

Step 5: Creating Mail Users

15. In order to start using squirrelmail webmail, you’ll have to create a new user, to do so, run.

$ sudo useradd myusername

Replace “myusername” with the user name you want, create a password for the new user by running.

$ sudo passwd myusername

16. Create a home folder for the user in /var/www/html/myusername and make it default home directory.

$ sudo mkdir -p /var/www/html/myusername
$ usermod -m -d /var/www/html/myusername myusername

17. Now go back to the login page and enter the user name and the password of newly created user.

Access Squirrelmail in Ubuntu

You will be surprise to see the following error message.

Login to Squirrelmail

This is just a problem in the permissions, you have to give the user “myusername” the complete permissions on its home folder.

$ sudo chown -R myusername:myusername /var/www/html/myusername

18. Once permission set, you should able to login into squirrelmail.

Squirrelmail Mail Interface

You can try to send email from it, or you can try to receive emails by sending it to “myusername@example.com” , don’t forget to replace “myusername” with the user name you created.

If you faced any other error.. Just check the “/var/log/mail.err” file, all the error message will be stored there, you won’t lose your way 🙂

Have you tried to create an email server before? How did it go? Have you used SquirrelMail or any other mail server before? What do you think about it?

Allow remote mysql connetion

Config file changes are required to enable connections via localhost.

To connect through remote IPs, Login as a “root” user and run the below queries in mysql.

CREATE USER 'username'@'localhost' IDENTIFIED BY 'password';

GRANT ALL PRIVILEGES ON *.* TO 'username'@'localhost' WITH GRANT OPTION;

CREATE USER 'username'@'%' IDENTIFIED BY 'password';

GRANT ALL PRIVILEGES ON *.* TO 'username'@'%' WITH GRANT OPTION;

FLUSH PRIVILEGES;

This will create a new user that is accessible on localhost as well as from remote IPs.

Also comment the below line from your my.cnf file located in /etc/mysql/my.cnf

bind-address = 127.0.0.1

Restart your mysql using

sudo service mysql restart

Now you should be able to connect remotely to your mysql.


thanks to :
http://stackoverflow.com/questions/8348506/grant-remote-access-of-mysql-database-from-any-ip-address

its work for me : )

docker install aufs driver

I follow this official tutorial for
https://docs.docker.com/engine/installation/linux/ubuntulinux/#/install-the-latest-version

There are problem in aufs driver install. I follow this command
sudo apt-get install linux-image-extra-$(uname -r) linux-image-extra-virtual

but the pacakge not found.

it happend because there are problem in name of kernel. i use vps from beon.co.id. They use name as “4.4.0-042stab117.16” in kernel name but when merge this text and commnd be invalid.
the command wiill be
sudo apt-get install linux-image-extra-4.4.0-042stab117.16 linux-image-extra-virtual

this is the problem ….
i try use manual using
sudo apt-get install linux-image-extra-4.4.0 linux-image-extra-virtual
it work for me…
heheheh…

the conclution is you must use the kernel version. not more…
thank you… 🙂

Install maven in cent os 7

thanks to : http://www.theshell.guru/install-maven-3-3-3-centos-6-7/

You need Java JDK installed, see this link Install Java JDK 1.8

Dont forget to INSTALL JDK and set JAVA_HOME to run maven

$ su -c “yum install java-1.8.0-openjdk-devel”

export JAVA_HOME=/usr/lib/jvm/jre-1.8.0-openjdk/

Download the package from: maven.apache.org

Move the compressed archive to the location you want and extract.

cd /opt

wget http://www.eu.apache.org/dist/maven/maven-3/3.3.3/binaries/apache-maven-3.3.3-bin.zip

unzip apache-maven-3.3.3-bin.zip

mv apache-maven-3.3.3 maven
note : download maven in https://maven.apache.org/download.cgi
change version of maven.
#!/bin/bash

MAVEN_HOME=/var/maven

PATH=$MAVEN_HOME/bin:$PATH

export PATH MAVEN_HOME

export CLASSPATH=.
chmod +x /etc/profile.d/maven.sh
source /etc/profile.d/maven.sh
mvn -version
Java version: 1.8.0_51, vendor: Oracle Corporation

Java home: /usr/lib/jvm/java-1.8.0-openjdk-1.8.0.51-3.b16.el6_7.x86_64/jre

Default locale: en_US, platform encoding: UTF-8

OS name: "linux", version: "2.6.32-573.7.1.el6.x86_64", arch: "amd64", family: "unix"